How To Add A Drop Down Menu In Shopify?
How to Add a Drop Down Menu in Shopify
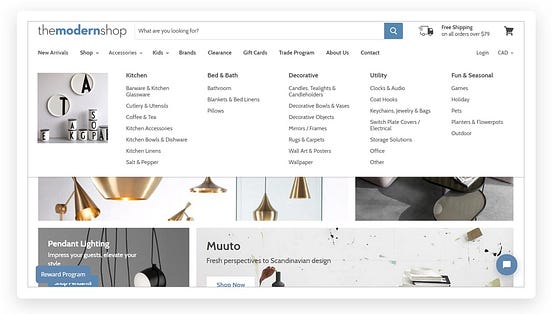
Adding a drop down menu to your Shopify store is a great way to showcase the products and services available on your website. It is also an excellent way to easily organize and categorize your items, making it easier for customers to find what they’re looking for. In this guide, we’ll walk you through the steps needed to create a dropdown menu for your Shopify store.
Creating the Dropdown Menu Collection
The first step in creating a dropdown menu in Shopify is to create a collection that will be used for the menu items. This collection can contain any number of items that you want to have included in the menu. To create the collection, simply go to your Shopify dashboard and select “Collections” from the sidebar. Then, click the “Create Collection” button to open a form that will allow you to enter the details for your collection. Give the collection a name, description, and image, and then click the “Create Collection” button to save it.
Adding Items to the Menu
The next step is to add the items that you want to have included in your dropdown menu. To do this, simply go to the “Products” section of your Shopify dashboard and choose the items that you want to add. Once you’ve selected the items, go to the “Collections” section of your Shopify admin panel and add the items to your collection by either checking the boxes next to the items or dragging and dropping them into the collection.
Creating the Dropdown Menu
Once you’ve created your collection and added the products to it, you can now create the actual dropdown menu. To do this, go to the “Navigation” section of your Shopify dashboard and click the “Add Menu” button. Give the menu a title, and then choose the collection you previously created. Shopify will then automatically generate the dropdown menu for you, and you’ll be able to preview the menu without having to publish it first.
Customizing the Menu
Once you’ve created the menu, you may want to customize it further. To do this, you can edit the menu from the “Navigation” section of your admin panel. Here you can add menu items, change the order of the menu items, and even add images and other visual elements to the menu. Additionally, you can add custom HTML or CSS code to the menu to further customize its look and feel.
Adding the Menu to Your Store
Once you’ve created and customized your dropdown menu, the next step is to add it to your Shopify store. To do this, simply go to the “Themes” section of your admin panel and click the “Edit HTML/CSS” button. Here you can add the code that will be used to render the menu on your store. Once you’ve added the code, save the changes and your dropdown menu will now be visible on your store.
Conclusion
Creating a dropdown menu in Shopify is a great way to showcase the products and services available on your website. It also allows you to easily organize and categorize your items, making it easier for customers to find what they’re looking for. By following the steps outlined in this guide, you should be able to easily create a dropdown menu for your store.
Post a Comment for "How To Add A Drop Down Menu In Shopify?"